> ## Documentation Index
> Fetch the complete documentation index at: https://docs-dev.auth0-mintlify.app/llms.txt
> Use this file to discover all available pages before exploring further.
# Migrate to Enhanced Security for Third-Party Applications
> Learn how enhanced security controls affect existing and newly created third-party applications.
export const AuthCodeGroup = ({children, dropdown}) => {
const [processedChildren, setProcessedChildren] = useState(children);
useEffect(() => {
let unsubscribe = null;
function init() {
unsubscribe = window.autorun(() => {
const processChildren = node => {
if (typeof node === "string") {
let processedNode = node;
for (const [key, value] of window.rootStore.variableStore.values.entries()) {
const escapedKey = key.replaceAll(/[.*+?^${}()|[\]\\]/g, (String.raw)`\$&`);
processedNode = processedNode.replaceAll(new RegExp(escapedKey, "g"), value);
}
return processedNode;
} else if (Array.isArray(node)) {
return node.map(processChildren);
} else if (node && node.props && node.props.children) {
return {
...node,
props: {
...node.props,
children: processChildren(node.props.children)
}
};
}
return node;
};
setProcessedChildren(processChildren(children));
});
}
if (window.rootStore) {
init();
} else {
window.addEventListener("adu:storeReady", init);
}
return () => {
window.removeEventListener("adu:storeReady", init);
unsubscribe?.();
};
}, [children]);
return {processedChildren};
};
export const AuthCodeBlock = ({filename, icon, language, highlight, children}) => {
const [displayText, setDisplayText] = useState(children);
const [copyText, setCopyText] = useState(children);
const wrapperRef = React.useRef(null);
useEffect(() => {
let unsubscribe = null;
function init() {
if (!window.autorun || !window.rootStore) {
return;
}
unsubscribe = window.autorun(() => {
let processedChildrenForDisplay = children;
let processedChildrenForCopy = children;
for (const [key, value] of window.rootStore.variableStore.values.entries()) {
const escapedKey = key.replaceAll(/[.*+?^${}()|[\]\\]/g, (String.raw)`\$&`);
let displayValue = value;
if (key === "{yourClientSecret}" && value !== "{yourClientSecret}") {
displayValue = value.substring(0, 3) + "*****MASKED*****";
}
processedChildrenForDisplay = processedChildrenForDisplay.replaceAll(new RegExp(escapedKey, "g"), displayValue);
processedChildrenForCopy = processedChildrenForCopy.replaceAll(new RegExp(escapedKey, "g"), value);
}
setDisplayText(processedChildrenForDisplay);
setCopyText(processedChildrenForCopy);
});
}
if (window.rootStore) {
init();
} else {
window.addEventListener("adu:storeReady", init);
}
return () => {
window.removeEventListener("adu:storeReady", init);
unsubscribe?.();
};
}, [children]);
useEffect(() => {
if (!wrapperRef.current) return;
const originalWriteText = navigator.clipboard.writeText.bind(navigator.clipboard);
let isOverriding = false;
const handleClick = e => {
const button = e.target.closest('[data-testid="copy-code-button"]');
if (!button || !wrapperRef.current.contains(button)) return;
isOverriding = true;
navigator.clipboard.writeText = text => {
if (isOverriding) {
isOverriding = false;
navigator.clipboard.writeText = originalWriteText;
return originalWriteText(copyText);
}
return originalWriteText(text);
};
setTimeout(() => {
if (isOverriding) {
isOverriding = false;
navigator.clipboard.writeText = originalWriteText;
}
}, 100);
};
const wrapper = wrapperRef.current;
wrapper.addEventListener('click', handleClick, true);
return () => {
wrapper.removeEventListener('click', handleClick, true);
if (navigator.clipboard.writeText !== originalWriteText) {
navigator.clipboard.writeText = originalWriteText;
}
};
}, [copyText]);
return
{displayText}
;
};
Starting October 23, 2026, Auth0 will change the default security mode for newly created third-party applications via the Management API. Third-party applications will use enhanced security controls aligned with [OAuth 2.1 best practices](https://datatracker.ietf.org/doc/html/draft-ietf-oauth-v2-1) by default.
This change only affects tenants that were using third-party applications before April 23, 2026, and only impacts newly created applications. Your existing third-party applications will continue to work as they do today with no changes required.
Auth0 strongly recommends adopting enhanced security controls for all new third-party applications. Enhanced controls provide explicit API authorization, mandatory use of PKCE, and a focused feature set aligned with OAuth 2.1 and security best practices. Applications with enhanced controls will also benefit from future capabilities such as application-level rate limits and improved management tooling. However, you can preserve existing behavior if needed for specific use cases.
To learn more about third-party applications, read [Third-Party Applications](/docs/get-started/applications/third-party-applications). For a detailed comparison of what's available in each mode, see [Feature comparison](#feature-comparison). For guidance on specific integration patterns, see [Common scenarios](#common-scenarios).
## How are you affected?
This migration affects you in two ways:
### 1. Management API default (the deprecation)
When you create third-party applications via `POST /api/v2/clients`, the default value for `third_party_security_mode` will change from `permissive` (existing behavior) to `strict` (enhanced security controls) on October 23, 2026.
All third-party applications created via the Auth0 Dashboard already use enhanced security controls. This is not configurable via the Auth0 Dashboard.
### 2. Dynamic Client Registration (independent configuration)
If you use [Dynamic Client Registration](/docs/get-started/applications/dynamic-client-registration), DCR clients are controlled by a separate `dynamic_client_registration_security_mode` tenant setting. This is independent of the deprecation and requires its own configuration decision.
## Migration tasks
### Review your third-party applications
Before choosing a migration path, review how your third-party applications operate to understand their current requirements. Consider:
* What grant types do they use? (authorization code, implicit, client credentials, etc.)
* Do they require OIDC scopes (openid, profile, email) or ID tokens?
* Do they use Classic Login or legacy endpoints?
* How are they created? (manually via Dashboard/API, or dynamically via DCR)
If you have a small number of third-party applications, you can inspect them individually using Auth0 Dashboard or Management API. Each application includes a `third_party_security_mode` property indicating its current security mode (`strict` or `permissive`).
**Harden existing permissive applications**: Consider reviewing the [API access policies](/docs/get-started/apis/api-access-policies-for-applications) on your APIs and setting them to **Require Client Grant** where appropriate. This ensures that permissive third-party applications must have an explicit grant to access those APIs. Note that this policy also applies to first-party applications, so review your existing integrations before changing it.
To understand what enhanced security controls mean for your integrations, review the [Feature comparison](#feature-comparison) below and check if your scenario matches any of the [Common scenarios](#common-scenarios). The [FAQ](#frequently-asked-questions) section also covers frequently asked questions about the migration.
### Step 1: Choose how to create new third-party applications
Decide whether new third-party applications created via the Management API should use enhanced security controls or preserve existing behavior. This choice applies to `POST /api/v2/clients` only. Applications created with the Auth0 Dashboard always use enhanced controls.
#### Option A: Complete the migration (Recommended)
Complete the migration before October 23, 2026 to make enhanced security controls the default. This approach aligns your third-party applications with OAuth 2.1 best practices and prepares them for future capabilities.
##### 1. Test enhanced security controls
Create a test third-party application with enhanced security controls to validate compatibility:
```bash cURL theme={null}
curl --request POST \
--url 'https://{yourDomain}/api/v2/clients' \
--header 'Authorization: Bearer {YOUR_MANAGEMENT_API_TOKEN}' \
--header 'Content-Type: application/json' \
--data '{
"name": "Test Third-Party App",
"is_first_party": false,
"third_party_security_mode": "strict",
"app_type": "regular_web",
"callbacks": ["https://partner.example.com/callback"],
"grant_types": ["authorization_code", "refresh_token"]
}'
```
The response will include a `client_id` with the `tpc_` prefix and `third_party_security_mode: "strict"`.
##### 2. Set up default API permissions
Third-party applications with enhanced security controls require explicit client grants to access APIs. Default permissions define a baseline set of APIs and scopes that all third-party applications can access automatically. This is important for dynamically created clients, where you cannot configure permissions for each application individually.
You can also define specific permissions for individual applications (by `client_id`) to grant broader or narrower access than the defaults. When both exist, per-application permissions take precedence over the defaults.
1. Navigate to **Applications > APIs**.
2. Select the API you want third-party applications to access.
3. Under the **Settings** tab, scroll to **Default Permissions for Third Party Apps**.
4. Select **Authorized** for User Access and/or Client Access.
5. Select the scopes to grant.
6. Click **Save**.
```bash cURL theme={null}
curl --request POST \
--url 'https://{yourDomain}/api/v2/client-grants' \
--header 'Authorization: Bearer {YOUR_MANAGEMENT_API_TOKEN}' \
--header 'Content-Type: application/json' \
--data '{
"default_for": "third_party_clients",
"audience": "https://api.example.com",
"scope": ["read:items", "write:items"],
"subject_type": "user"
}'
```
You can configure separate default permissions for third-party applications for user access (`subject_type: "user"`) and machine-to-machine access (`subject_type: "client"`).
To learn more, read [Default permissions for third-party applications](/docs/get-started/applications/application-access-to-apis-client-grants#default-permissions-for-third-party-applications).
##### 3. Validate compatibility
Test your workflows for creating third-party applications with enhanced security controls enabled. Confirm that:
* Your applications can use `authorization_code`, `refresh_token`, and `client_credentials` grant types
* PKCE is implemented in your authorization flows
* You do not require OIDC scopes
* You do not require Classic Login or legacy endpoints
* Your tenant does not have active [Rules](/docs/customize/rules) that need to execute for third-party login flows. Rules are not supported for strict third-party applications and will result in an error. If you use Rules, consider [migrating to Actions](/docs/customize/actions/migrate/migrate-from-rules-to-actions) or use permissive mode.
If you identify compatibility issues, read [Troubleshoot Third-Party Applications](/docs/get-started/applications/third-party-applications/troubleshooting).
##### 4. Complete the migration
Once you've validated compatibility, complete the migration by turning off the **Create Permissive Third-Party Clients by Default** toggle:
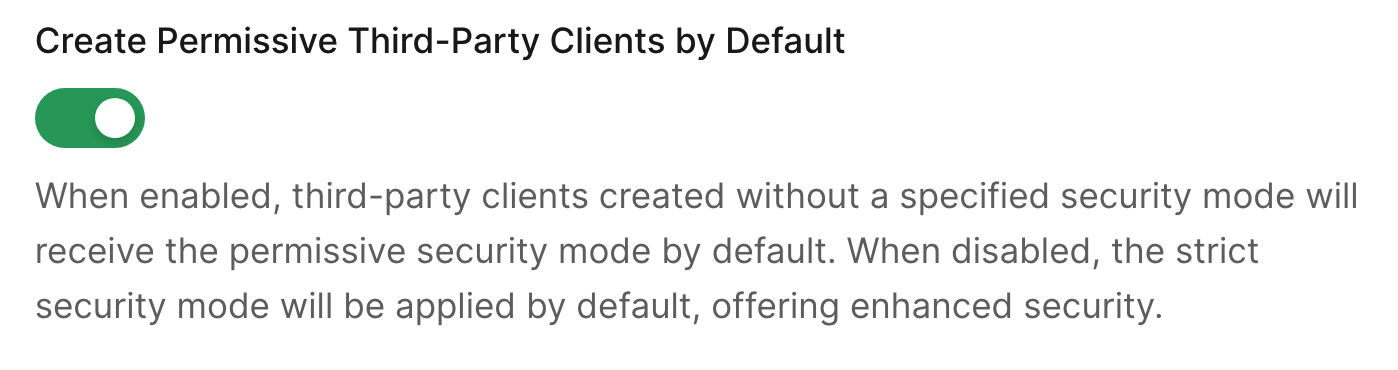 In the Auth0 Dashboard:
1. Navigate to **Settings > Advanced**.
2. Scroll to the **Migrations** section.
3. Toggle off **Create Permissive Third-Party Clients by Default**.
4. Select **Save**.
After completing the migration, when you create third-party applications via `POST /api/v2/clients`, you can:
* Omit the `third_party_security_mode` parameter (enhanced controls apply by default), or
* Explicitly set `third_party_security_mode: "strict"`
**After October 23, 2026**: The **Create Permissive Third-Party Clients by Default** toggle will be automatically turned off for all eligible tenants. To create applications with existing behavior, you must explicitly specify `third_party_security_mode: "permissive"` in the `POST` request to the `/api/v2/clients` endpoint.
#### Option B: Preserve existing behavior as the default
If you need to continue creating third-party applications with existing behavior as the default, you can keep the **Create Permissive Third-Party Clients by Default** toggle enabled until you're ready to adopt enhanced security controls.
This option preserves your current workflows but does not provide the security benefits of enhanced controls. Auth0 strongly recommends adopting enhanced security controls for all new third-party applications.
##### Before the deadline
The **Create Permissive Third-Party Clients by Default** toggle stays enabled (no action required on the toggle itself). However, you must prepare your workflows to explicitly specify the security mode after the deadline.
Update your application creation code to explicitly pass `third_party_security_mode: "permissive"`:
```bash cURL theme={null}
curl --request POST \
--url 'https://{yourDomain}/api/v2/clients' \
--header 'Authorization: Bearer {YOUR_MANAGEMENT_API_TOKEN}' \
--header 'Content-Type: application/json' \
--data '{
"name": "Partner Integration",
"is_first_party": false,
"third_party_security_mode": "permissive",
"app_type": "regular_web",
"callbacks": ["https://partner.example.com/callback"]
}'
```
Test this approach before the deadline to ensure your workflows handle the explicit parameter correctly.
##### After the deadline
On October 23, 2026, the **Create Permissive Third-Party Clients by Default** toggle will be automatically turned off. To continue creating applications with existing behavior, you must explicitly set `third_party_security_mode: "permissive"` in every `POST /api/v2/clients` request.
If you omit the `third_party_security_mode` parameter, enhanced security controls will be applied by default.
### Step 2: Choose how to handle Dynamic Client Registration
If you use [Dynamic Client Registration](/docs/get-started/applications/dynamic-client-registration), configure the security mode for DCR clients separately. This is independent of the [Management API default change](/docs/troubleshoot/product-lifecycle/deprecations-and-migrations/migrate-to-enhanced-security-third-party-applications#1-management-api-default-the-deprecation) and you can configure it at any time.
Before enabling enhanced security controls for DCR, ensure you have configured [default API permissions](/docs/get-started/applications/application-access-to-apis-client-grants#default-permissions-for-third-party-applications) for third-party applications. Without default permissions, DCR clients will not be able to access any APIs.
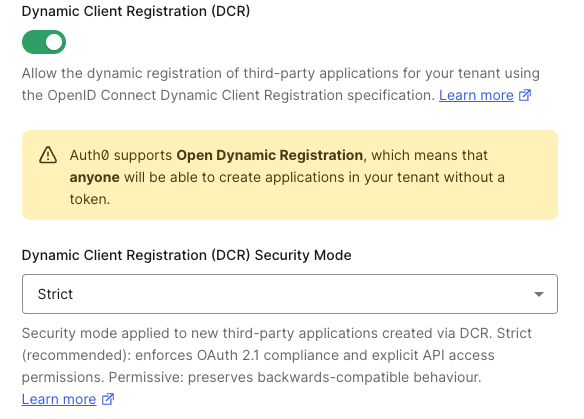
#### Review current DCR behavior
Check your current DCR security mode setting:
1. Navigate to **Settings > Advanced**. Under **Dynamic Client Registration (DCR) Security Mode**, check the current value.
In the Auth0 Dashboard:
1. Navigate to **Settings > Advanced**.
2. Scroll to the **Migrations** section.
3. Toggle off **Create Permissive Third-Party Clients by Default**.
4. Select **Save**.
After completing the migration, when you create third-party applications via `POST /api/v2/clients`, you can:
* Omit the `third_party_security_mode` parameter (enhanced controls apply by default), or
* Explicitly set `third_party_security_mode: "strict"`
**After October 23, 2026**: The **Create Permissive Third-Party Clients by Default** toggle will be automatically turned off for all eligible tenants. To create applications with existing behavior, you must explicitly specify `third_party_security_mode: "permissive"` in the `POST` request to the `/api/v2/clients` endpoint.
#### Option B: Preserve existing behavior as the default
If you need to continue creating third-party applications with existing behavior as the default, you can keep the **Create Permissive Third-Party Clients by Default** toggle enabled until you're ready to adopt enhanced security controls.
This option preserves your current workflows but does not provide the security benefits of enhanced controls. Auth0 strongly recommends adopting enhanced security controls for all new third-party applications.
##### Before the deadline
The **Create Permissive Third-Party Clients by Default** toggle stays enabled (no action required on the toggle itself). However, you must prepare your workflows to explicitly specify the security mode after the deadline.
Update your application creation code to explicitly pass `third_party_security_mode: "permissive"`:
```bash cURL theme={null}
curl --request POST \
--url 'https://{yourDomain}/api/v2/clients' \
--header 'Authorization: Bearer {YOUR_MANAGEMENT_API_TOKEN}' \
--header 'Content-Type: application/json' \
--data '{
"name": "Partner Integration",
"is_first_party": false,
"third_party_security_mode": "permissive",
"app_type": "regular_web",
"callbacks": ["https://partner.example.com/callback"]
}'
```
Test this approach before the deadline to ensure your workflows handle the explicit parameter correctly.
##### After the deadline
On October 23, 2026, the **Create Permissive Third-Party Clients by Default** toggle will be automatically turned off. To continue creating applications with existing behavior, you must explicitly set `third_party_security_mode: "permissive"` in every `POST /api/v2/clients` request.
If you omit the `third_party_security_mode` parameter, enhanced security controls will be applied by default.
### Step 2: Choose how to handle Dynamic Client Registration
If you use [Dynamic Client Registration](/docs/get-started/applications/dynamic-client-registration), configure the security mode for DCR clients separately. This is independent of the [Management API default change](/docs/troubleshoot/product-lifecycle/deprecations-and-migrations/migrate-to-enhanced-security-third-party-applications#1-management-api-default-the-deprecation) and you can configure it at any time.
Before enabling enhanced security controls for DCR, ensure you have configured [default API permissions](/docs/get-started/applications/application-access-to-apis-client-grants#default-permissions-for-third-party-applications) for third-party applications. Without default permissions, DCR clients will not be able to access any APIs.
#### Review current DCR behavior
Check your current DCR security mode setting:
1. Navigate to **Settings > Advanced**. Under **Dynamic Client Registration (DCR) Security Mode**, check the current value.
 Make a `GET` request to the `/api/v2/tenants/settings` endpoint to fetch your tenant settings:
```bash cURL theme={null}
curl --request GET \
--url 'https://{yourDomain}/api/v2/tenants/settings' \
--header 'Authorization: Bearer {YOUR_MANAGEMENT_API_TOKEN}'
```
Look for the `dynamic_client_registration_security_mode` property in the response. If not present, DCR clients currently use existing behavior by default.
#### Configure DCR security mode
Choose the security mode you want for dynamically registered clients:
**Option A: Enhanced security controls for DCR clients** (recommended)
Before enabling strict mode for DCR, configure [default API permissions](/docs/get-started/applications/application-access-to-apis-client-grants#default-permissions-for-third-party-applications) for third-party applications. Without default permissions, DCR clients will not be able to access any APIs.
Set `dynamic_client_registration_security_mode` to `strict`:
```bash cURL theme={null}
curl --request PATCH \
--url 'https://{yourDomain}/api/v2/tenants/settings' \
--header 'Authorization: Bearer {YOUR_MANAGEMENT_API_TOKEN}' \
--header 'Content-Type: application/json' \
--data '{
"dynamic_client_registration_security_mode": "strict"
}'
```
**Option B: Preserve existing behavior for DCR clients**
Keep or set `dynamic_client_registration_security_mode` to `permissive`:
```bash cURL theme={null}
curl --request PATCH \
--url 'https://{yourDomain}/api/v2/tenants/settings' \
--header 'Authorization: Bearer {YOUR_MANAGEMENT_API_TOKEN}' \
--header 'Content-Type: application/json' \
--data '{
"dynamic_client_registration_security_mode": "permissive"
}'
```
To learn more, read [Dynamic Client Registration](/docs/get-started/applications/dynamic-client-registration).
## Feature comparison
The following table compares the capabilities available to each security mode:
| Capability | Enhanced Security Controls | Existing Behavior |
| --------------------------- | -------------------------------------------------------------------------------------------------------------------------------------- | --------------------------- |
| **Grant types** | `authorization_code`, `refresh_token`, `client_credentials` | All grant types available |
| **PKCE** | Mandatory | Optional |
| **OIDC** | Not available. Planned for a future release. | Supported |
| **API authorization** | Always requires explicit client grant | Follows API's access policy |
| **Classic Login** | Not supported | Supported |
| **Legacy endpoints** | Not available | Available |
| **Client ID format** | `tpc_` prefix | Standard format |
| **Configurable properties** | [Curated set of properties](/docs/get-started/applications/third-party-applications/security-controls#restricted-client-configuration) | All properties |
| **Future capabilities** | Rate limits and future improved security and management capabilities | Not available |
| **Creation via Dashboard** | Always uses enhanced controls | Not available via Dashboard |
## Common scenarios
### Scenario 1: Partner integrations using modern OAuth
**Situation**: You have partner integrations that use authorization code flow with PKCE and access your APIs.
**Recommendation**: Adopt enhanced security controls (Option A). This is fully compatible with modern OAuth implementations and provides additional security benefits.
**Steps**:
1. Set up default API permissions for your APIs
2. Test creating a partner application with `third_party_security_mode: "strict"`
3. Complete the migration by turning off the migration toggle
### Scenario 2: Applications requiring OIDC
**Situation**: Your third-party applications require OIDC scopes (openid, profile, email) or ID tokens.
**Recommendation**: OIDC support for third-party applications is planned for a future release. Until then, preserve existing behavior (Option B) or migrate to API-scoped access tokens.
**Steps**:
* If you must use OIDC, keep the migration toggle enabled and explicitly pass `third_party_security_mode: "permissive"` when creating applications
* Alternatively, update your integrations to use API scopes instead of OIDC scopes
### Scenario 3: Dynamic Client Registration (MCP, AI agents)
**Situation**: You use DCR for AI agents, MCP servers, or developer portal applications.
**Recommendation**: Configure `dynamic_client_registration_security_mode: "strict"` and set up default API permissions. MCP clients (Claude Code, VS Code) are compatible with enhanced security controls.
**Steps**:
1. Configure default API permissions
2. Set `dynamic_client_registration_security_mode: "strict"` via Management API
3. Test with a DCR registration
4. Verify DCR clients can obtain access tokens
### Scenario 4: Applications using Classic Login
**Situation**: Your third-party applications use Classic Login instead of Universal Login.
**Recommendation**: Classic Login is not supported for third-party applications with enhanced security controls. Migrate to Universal Login or preserve existing behavior.
**Steps**:
* Recommended: Migrate to Universal Login before adopting enhanced controls
* Alternative: Keep the migration toggle enabled and explicitly use `third_party_security_mode: "permissive"`
## Troubleshooting
To learn how to resolve common errors during the migration, read [Troubleshoot Third-Party Applications](/docs/get-started/applications/third-party-applications/troubleshooting).
## Frequently asked questions
### Can I change the security mode on an existing application?
No. The `third_party_security_mode` is set when the application is created and cannot be changed afterward. To use a different security mode, create a new application.
### What happens to my existing third-party applications?
Nothing. Existing third-party applications continue working exactly as they do today. This migration only affects the default for newly created applications.
### Can I use both security modes in the same tenant?
Yes. You can have some third-party applications with enhanced security controls and others with existing behavior. The security mode is configured per application.
### What about Dynamic Client Registration?
DCR is controlled by a separate `dynamic_client_registration_security_mode` tenant setting. This is independent of the deprecation and requires its own configuration decision. To learn more, read [Dynamic Client Registration](/docs/get-started/applications/dynamic-client-registration).
### Can I create applications with existing behavior after the deadline?
Yes, but only using the Management API. Explicitly set `third_party_security_mode: "permissive"` when creating each application. The Auth0 Dashboard does not support creating applications with existing behavior.
### Will future features work with existing behavior?
Some future features (such as application-level rate limits) will only be available for applications with enhanced security controls.
## Learn more
* [Third-Party Applications](/docs/get-started/applications/third-party-applications)
* [Security Controls for Third-Party Applications](/docs/get-started/applications/third-party-applications/security-controls)
* [First-Party and Third-Party Applications](/docs/get-started/applications/first-party-and-third-party-applications)
* [Application Access to APIs: Client Grants](/docs/get-started/applications/application-access-to-apis-client-grants)
* [Dynamic Client Registration](/docs/get-started/applications/dynamic-client-registration)
* [Troubleshoot Third-Party Applications](/docs/get-started/applications/third-party-applications/troubleshooting)
* [OAuth 2.1 Specification](https://datatracker.ietf.org/doc/html/draft-ietf-oauth-v2-1)
Make a `GET` request to the `/api/v2/tenants/settings` endpoint to fetch your tenant settings:
```bash cURL theme={null}
curl --request GET \
--url 'https://{yourDomain}/api/v2/tenants/settings' \
--header 'Authorization: Bearer {YOUR_MANAGEMENT_API_TOKEN}'
```
Look for the `dynamic_client_registration_security_mode` property in the response. If not present, DCR clients currently use existing behavior by default.
#### Configure DCR security mode
Choose the security mode you want for dynamically registered clients:
**Option A: Enhanced security controls for DCR clients** (recommended)
Before enabling strict mode for DCR, configure [default API permissions](/docs/get-started/applications/application-access-to-apis-client-grants#default-permissions-for-third-party-applications) for third-party applications. Without default permissions, DCR clients will not be able to access any APIs.
Set `dynamic_client_registration_security_mode` to `strict`:
```bash cURL theme={null}
curl --request PATCH \
--url 'https://{yourDomain}/api/v2/tenants/settings' \
--header 'Authorization: Bearer {YOUR_MANAGEMENT_API_TOKEN}' \
--header 'Content-Type: application/json' \
--data '{
"dynamic_client_registration_security_mode": "strict"
}'
```
**Option B: Preserve existing behavior for DCR clients**
Keep or set `dynamic_client_registration_security_mode` to `permissive`:
```bash cURL theme={null}
curl --request PATCH \
--url 'https://{yourDomain}/api/v2/tenants/settings' \
--header 'Authorization: Bearer {YOUR_MANAGEMENT_API_TOKEN}' \
--header 'Content-Type: application/json' \
--data '{
"dynamic_client_registration_security_mode": "permissive"
}'
```
To learn more, read [Dynamic Client Registration](/docs/get-started/applications/dynamic-client-registration).
## Feature comparison
The following table compares the capabilities available to each security mode:
| Capability | Enhanced Security Controls | Existing Behavior |
| --------------------------- | -------------------------------------------------------------------------------------------------------------------------------------- | --------------------------- |
| **Grant types** | `authorization_code`, `refresh_token`, `client_credentials` | All grant types available |
| **PKCE** | Mandatory | Optional |
| **OIDC** | Not available. Planned for a future release. | Supported |
| **API authorization** | Always requires explicit client grant | Follows API's access policy |
| **Classic Login** | Not supported | Supported |
| **Legacy endpoints** | Not available | Available |
| **Client ID format** | `tpc_` prefix | Standard format |
| **Configurable properties** | [Curated set of properties](/docs/get-started/applications/third-party-applications/security-controls#restricted-client-configuration) | All properties |
| **Future capabilities** | Rate limits and future improved security and management capabilities | Not available |
| **Creation via Dashboard** | Always uses enhanced controls | Not available via Dashboard |
## Common scenarios
### Scenario 1: Partner integrations using modern OAuth
**Situation**: You have partner integrations that use authorization code flow with PKCE and access your APIs.
**Recommendation**: Adopt enhanced security controls (Option A). This is fully compatible with modern OAuth implementations and provides additional security benefits.
**Steps**:
1. Set up default API permissions for your APIs
2. Test creating a partner application with `third_party_security_mode: "strict"`
3. Complete the migration by turning off the migration toggle
### Scenario 2: Applications requiring OIDC
**Situation**: Your third-party applications require OIDC scopes (openid, profile, email) or ID tokens.
**Recommendation**: OIDC support for third-party applications is planned for a future release. Until then, preserve existing behavior (Option B) or migrate to API-scoped access tokens.
**Steps**:
* If you must use OIDC, keep the migration toggle enabled and explicitly pass `third_party_security_mode: "permissive"` when creating applications
* Alternatively, update your integrations to use API scopes instead of OIDC scopes
### Scenario 3: Dynamic Client Registration (MCP, AI agents)
**Situation**: You use DCR for AI agents, MCP servers, or developer portal applications.
**Recommendation**: Configure `dynamic_client_registration_security_mode: "strict"` and set up default API permissions. MCP clients (Claude Code, VS Code) are compatible with enhanced security controls.
**Steps**:
1. Configure default API permissions
2. Set `dynamic_client_registration_security_mode: "strict"` via Management API
3. Test with a DCR registration
4. Verify DCR clients can obtain access tokens
### Scenario 4: Applications using Classic Login
**Situation**: Your third-party applications use Classic Login instead of Universal Login.
**Recommendation**: Classic Login is not supported for third-party applications with enhanced security controls. Migrate to Universal Login or preserve existing behavior.
**Steps**:
* Recommended: Migrate to Universal Login before adopting enhanced controls
* Alternative: Keep the migration toggle enabled and explicitly use `third_party_security_mode: "permissive"`
## Troubleshooting
To learn how to resolve common errors during the migration, read [Troubleshoot Third-Party Applications](/docs/get-started/applications/third-party-applications/troubleshooting).
## Frequently asked questions
### Can I change the security mode on an existing application?
No. The `third_party_security_mode` is set when the application is created and cannot be changed afterward. To use a different security mode, create a new application.
### What happens to my existing third-party applications?
Nothing. Existing third-party applications continue working exactly as they do today. This migration only affects the default for newly created applications.
### Can I use both security modes in the same tenant?
Yes. You can have some third-party applications with enhanced security controls and others with existing behavior. The security mode is configured per application.
### What about Dynamic Client Registration?
DCR is controlled by a separate `dynamic_client_registration_security_mode` tenant setting. This is independent of the deprecation and requires its own configuration decision. To learn more, read [Dynamic Client Registration](/docs/get-started/applications/dynamic-client-registration).
### Can I create applications with existing behavior after the deadline?
Yes, but only using the Management API. Explicitly set `third_party_security_mode: "permissive"` when creating each application. The Auth0 Dashboard does not support creating applications with existing behavior.
### Will future features work with existing behavior?
Some future features (such as application-level rate limits) will only be available for applications with enhanced security controls.
## Learn more
* [Third-Party Applications](/docs/get-started/applications/third-party-applications)
* [Security Controls for Third-Party Applications](/docs/get-started/applications/third-party-applications/security-controls)
* [First-Party and Third-Party Applications](/docs/get-started/applications/first-party-and-third-party-applications)
* [Application Access to APIs: Client Grants](/docs/get-started/applications/application-access-to-apis-client-grants)
* [Dynamic Client Registration](/docs/get-started/applications/dynamic-client-registration)
* [Troubleshoot Third-Party Applications](/docs/get-started/applications/third-party-applications/troubleshooting)
* [OAuth 2.1 Specification](https://datatracker.ietf.org/doc/html/draft-ietf-oauth-v2-1)